Monthly Archives: March 2014

Gauges Re-Installed

I took a little time to re-install the pillar gauge pod today,  I was tired of looking at the metal.  But first I wanted to fix the cruise control so it would work properly.  Unfortunately I got wrapped up in the work and neglected to really get any good pictures this time around.

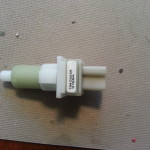
I had to order a second brake switch and pigtail to put on the clutch since the factory M6 cars used a bit different switch that would have been more of a pain to wire in.

Factory M6 clutch switch.

Factory Clutch Switch


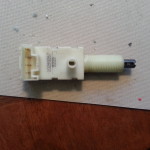
And here is the brake switch that I replaced it with.

New Brake Switch


Here is the A4 factory pigtail that goes to the brake switch.  I don’t know why it was wrapped in electrical tape that was then wrapped with masking tape as neither wire had been cut.

Brake Pigtail

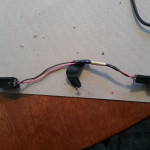
Now, GM does sell a split pigtail that will run to both the clutch and brake from the single pair but as usual it is expensive.  So instead I decided to make my own.  I snipped the brown wire on the pigtail and soldered the new pigtail in series so that it should act as a single circuit now.  I haven’t had the chance to test it yet but this should allow both the brake and clutch to turn off cruise control.

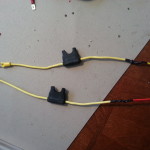
With that done I went to working on the gauge pod.  I ditched the lame expansion fuse holder that plugged into the block and then had other fuses attach to it and instead went with some inline fuse holders.  I soldered them into the harness with male disconnects on the end that I plugged into the block sections that were intended for aftermarket power needs, then outfitted them with 3 amp fuses

Inline Fuses


After feeding everything back through the dash and bolting the pillar pod up, I found that the existing hole that I drilled in the firewall was too small to accommodate the new vacuum hose that needed to be run in addition to the other sender wires.  Pulled the grommet out and re-drilled it up to 1/2″ then found another grommet that fit the new hole and we were in business.  I also chose to upgrade the wires for the water temp sender as well.  It previously only had about 6 inches of lead with this pain in the ass bullet style connectors that were next to impossible to get connected right once the sender was in the head.  So I snipped them off and for the ground, just wired in a few feet of cable that runs straight to a ring terminal and no more disconnects.  For the signal cable I also soldered in a few feet of wire that ended in a spade disconnect that is much easier to access and soldered the corresponding disconnect onto the gauge signal wire.  Installing the vacuum hose turned out to be the most time consuming part of the job.  For starters it took a great deal of effort and cursing just to get the hose onto the supplied T connector.  Then I had to pull most of the top end off just to access the hose that I was going to tap into on the back of the intake manifold.  But with that done I put wire loom on all the signal & ground wires and zip tied them to secure places.

With everything hooked back up I fire her back up.  Aaaaand, the water temp gauge has no power at all and the fuel pressure is pegged out.  The vacuum gauge is working perfectly though.  The fuel pressure is likely a ground issue, I ran into this some with it previously so I will work on that later.  The most irritating part of this is the lack of power to the water temp, this means I will have to pull the whole pod again to troubleshoot the problem.  And I hope it turns out to be something stupid like the plug is not all the way in and not a real wiring issue because I will have to unwrap a crap ton of tape to get to the solder points again then wrap it back up.


Harrowing Hydraulics

So I spent pretty much the entire day pulling the transmission out yet again.  This time it was because of the slave cylinder hydraulics.  On the day after I wrapped up the 6-speed swap, I ran into a problem while backing out of my driveway where the clutch suddenly went rock hard and would not depress.  I tried to asses the situation on the side of the street and couldn’t see anything wrong so I pushed the car back into the garage and put it back up in the air.  After a little investigation I found that the fitting from the master cylinder was not completely seated into the slave.  I thought that perhaps I didn’t seat it all the way when originally connecting it.  So I pushed it back in, re-bled the clutch and then off I went.

Until a few days later when it happened again just trying to back out of the garage.  This time the fitting had been completely ejected from the slave quick connect.  I once again put it back in and made sure I heard the click signaling that it was where it was supposed to be.  For piece of mind I tossed a few tools and a small floor jack in the trunk then went off to my folks for dinner.  When leaving for the night I decided to take a cruise across the reservoir spillway and the long way home.  I was turning at a red light and as soon as I shifted out first I lost the clutch again.  This time it had been less than 20 miles total.  I managed to coast it into a mostly deserted parking lot where I pulled out the tools to try and fix it.  Dark lots, hot exhaust pipes and trying to work on your transmission at night don’t make for a very good combination.  I managed to get the fitting back in but not before burning my forearm a few times on the exhaust.  The clutch was a bit spongy since I wasn’t able to bleed the clutch again as I did not being any fluid with me.  I was able to limp it home however and there she was locked up yet again until I could get this sorted out.

I went looking around in some forums to see anyone else had seen this issue before and came up mostly empty.  I did connect with one guy however that had some trouble with the quick connect not staying on in the past and he simply replaced the fitting with an aftermarket setup.  The common factor in both cases however, was a quick connect fitting that used a metal clip to retain the male section of the fitting rather than the small metal fingers that OEM slaves used.  The more I thought about it, the more it made sense to me that the clip was probably flexing under the additional pressure of my aftermarket master cylinder causing it to lose grip on the connection.  I found another guy on LS1Tech who had an OEM style quick connect that he didn’t need so I picked that up from him and thought I would give that a try instead of dropping more money on an OEM style slave.

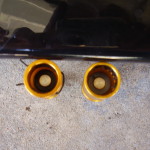
Here is a side by side comparison of the two styles of quick connects.  On the left is the crappy one that came with a duralast slave from the local parts store, you can see how the metal clip would be a definite weak link to retaining the connection.  On the right is the OEM style of retaining fingers that will not allow the connection to separate without being depressed first.

Slave Quick Connect Comparison


So I spent a few hours pulling the exhaust and transmission to get to the slave so that I could spend all of 30 seconds replacing the quick connect fitting.  Then another few hours putting it all back together again.  But it’s done and I went cruising around in it some today making plenty of regular shifts and some hard ones to see if it was going to hold.  So far, so good.  I’m going to keep the tools in the trunk for a little longer however to to make sure.  Maybe after a few hundred miles without an incident I’ll feel good enough to leave them at home again.

And I still haven’t gotten around to buffing the repainted headlight door yet but the assembly was replaced and that’s all working good again as well.